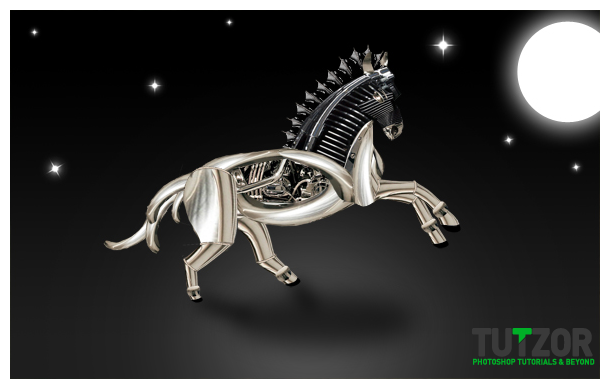
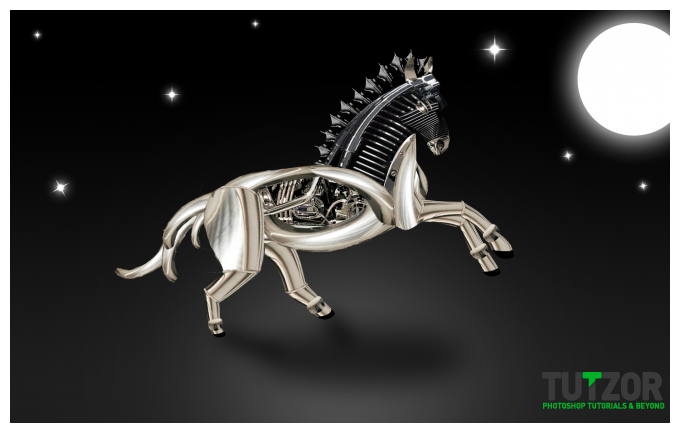
Robotic horse
20
Mar'11
Step
26
 sunrise20
Member since:
Mar 2011
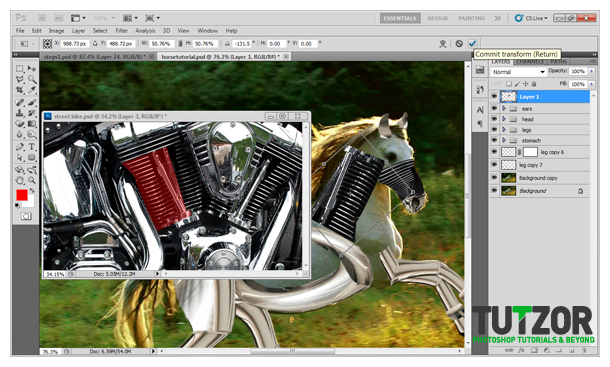
Next I want to create the neck. Use the image “bike” to crop out the neck piece and place it on the horse canvas. Once this is done, free transform, warp and mask as needed. Name this layer “neck” and place this layer under the “stomach” group and group this layer and name it “neck”.

Step
27
 sunrise20
Member since:
Mar 2011
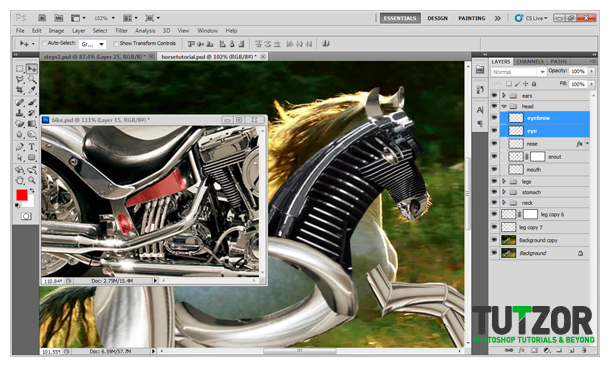
At this point I want to give our horse an eye to see and an eyebrow to give it attitude. Crop the red highlighted pieces from the bike image and place these layers into the “head” group name these layers “eye” and “eyebrow”. How does it look?

Step
28
 sunrise20
Member since:
Mar 2011
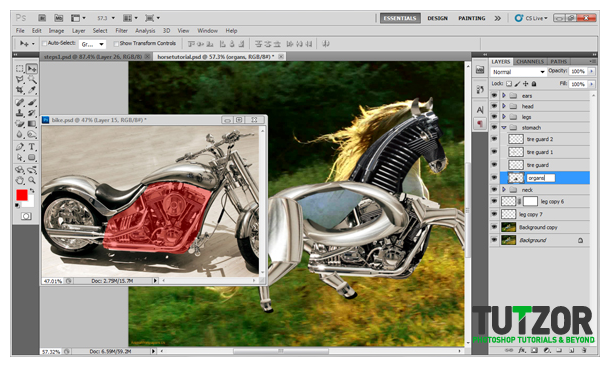
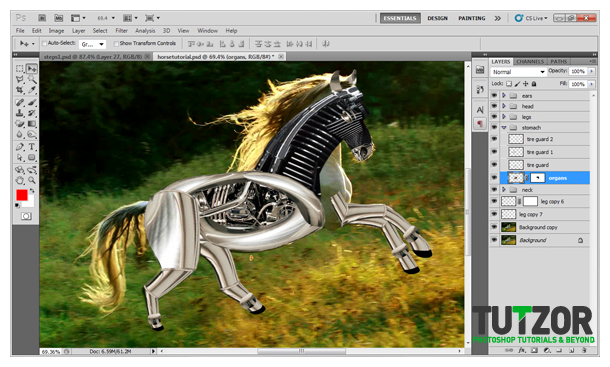
Now we will move on to create the middle body piece. This will actually be really easy since all we have to do is crop out a big section of the bike and add it into the “stomach” group, making it the last layer. Name this layer “organs”.

Step
29
 sunrise20
Member since:
Mar 2011
We are going to take the middle of the bike and fit it perfectly inside the center of the body and then mask the unwanted parts. I want it to look like we can see the inside of the horse which will look like organs. Use a mask to hide unwanted parts.

Step
30
 sunrise20
Member since:
Mar 2011
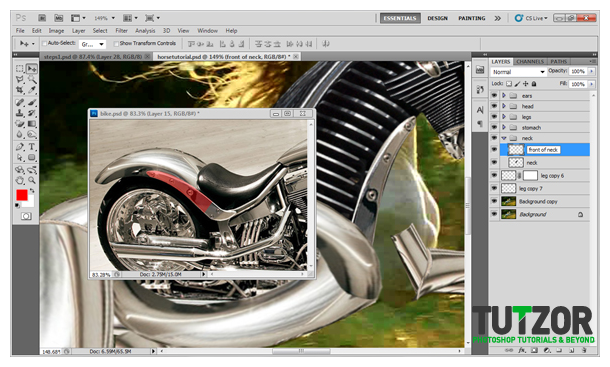
Next I want to add something to the front neck of the horse so I will crop out a piece of metal from under the tire guard and use this as it looks to curve nicely. Place this layer in the “neck” group as the top layer and flip the layer vertically and position it similar to mine.

Step
31
 sunrise20
Member since:
Mar 2011
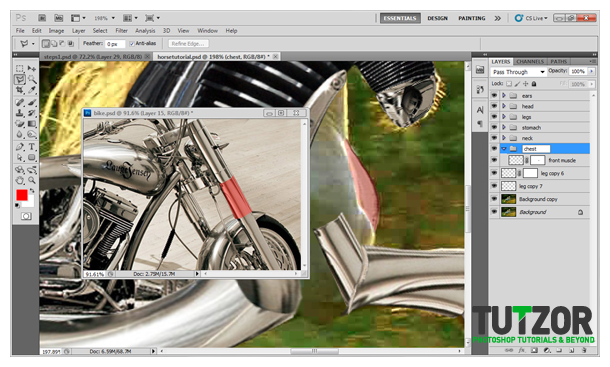
I want to work on the front chest of the horse so go to the bike image and crop and paste the front pipe onto the horse canvas and put this below the “neck” group and name this layer “front muscle” and group this layer with the name “chest”. Then use the transform and warp method to adjust the pipe and mask the unwanted parts (I highlighted this part red so that you can see exactly what I did).

Step
32
 sunrise20
Member since:
Mar 2011
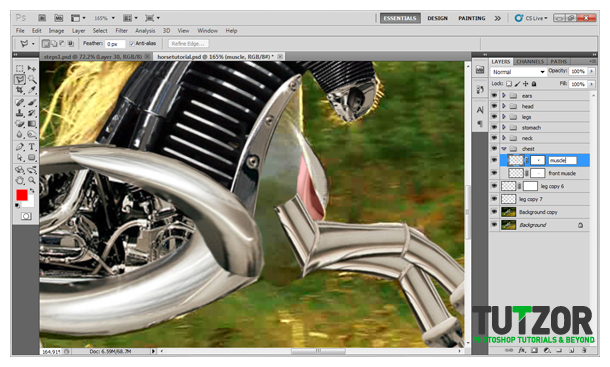
Here, I duplicated the “tire guard 2” layer from the “stomach” group and named this layer “muscle”. I then placed this layer on top in the “chest” group and flipped it vertically. I then shrank, warped and masked the unwanted parts. I hope you are used to this by now as this tutorial favors this routine.

Step
33
 sunrise20
Member since:
Mar 2011
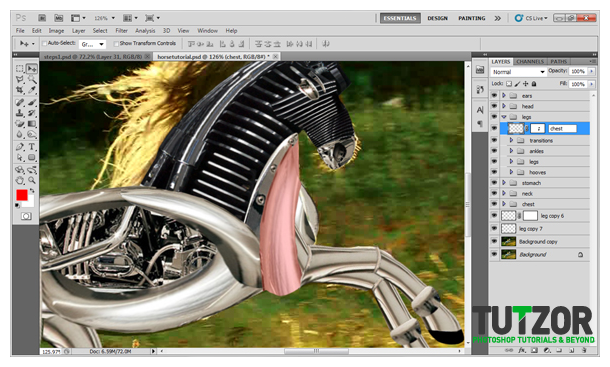
Now to fill in the remaining space on the chest, I am going to use the same layer “tire guard 2” and place this on top in the “legs” group and mask what I do not want. I am placing this layer here because this needs to be on top of certain layers and below others. Give this layer the name “chest”.


Step
34
 sunrise20
Member since:
Mar 2011
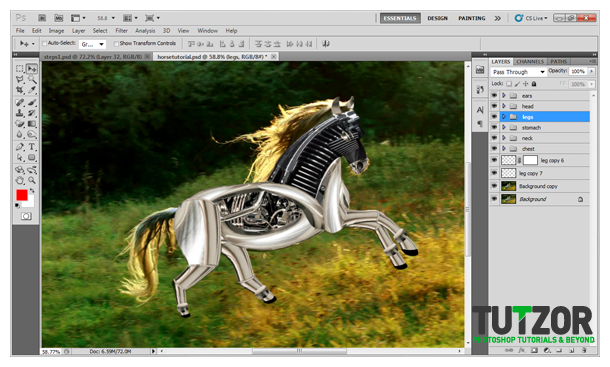
Lets take a look at what we have now…

Step
35
 sunrise20
Member since:
Mar 2011
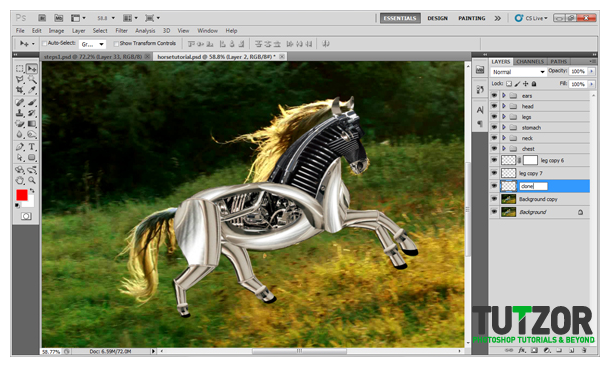
Next, I want to remove the hair from the horse so that we can add out own hair. To do this, I am going to create a new layer above layer “background copy” and name it “clone”.

Step
36
 sunrise20
Member since:
Mar 2011
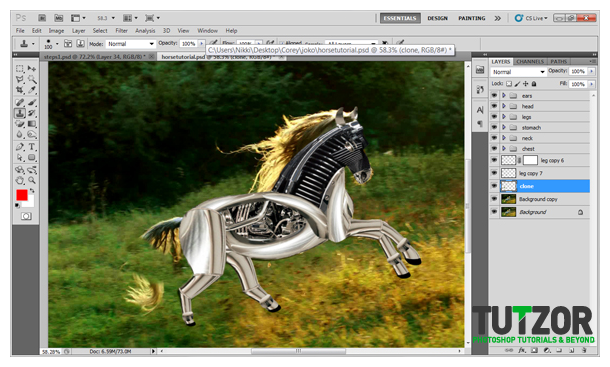
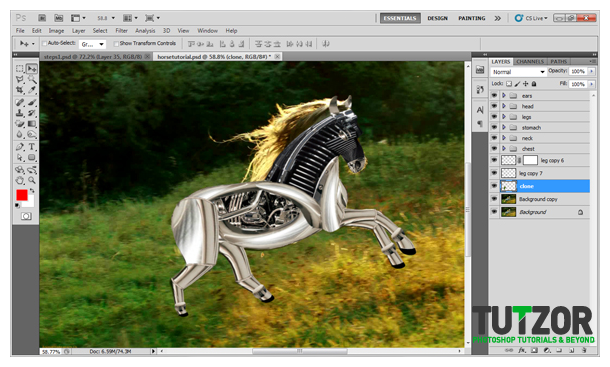
Choose the clone stamp tool, change your sample option in the options section at the top from “current layer” to “all layers” and take samples of sections that will replace the tail as if it were not there. To take a sample from the grass, press the alt key which will reveal a circle on your cursor and click to sample the section you want. When you have made your selection, release alt and click over the tail to start adding the grass to that section. You may need to sample sections a few times before it turns out great. (Since this layer is below all of our layers, it will not matter to go over any layers) I have provided an example of my first click.

Step
37
 sunrise20
Member since:
Mar 2011
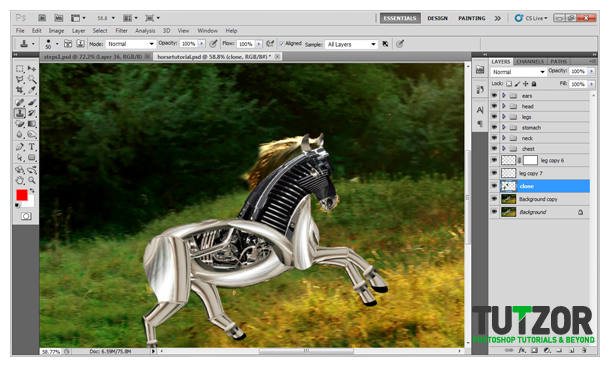
Here I have showed you a second example of the clone stamp tool removing the entire tail.

Step
38
 sunrise20
Member since:
Mar 2011
Now let’s finish the rest of the hair. We are going to use the same method of clone stamping but this one will be a little trickier since we have different transitions from trees, to dark trees, to light grass. On the same layer “clone”, use the clone stamp tool and attempt this method again. If it does not come out right, just edit>undo and try again until you make it look as if the horse never had hair. So pretty much we want a bald horse. Never seen a bald horse but in Photoshop, you can see almost anything.

Step
39
 sunrise20
Member since:
Mar 2011
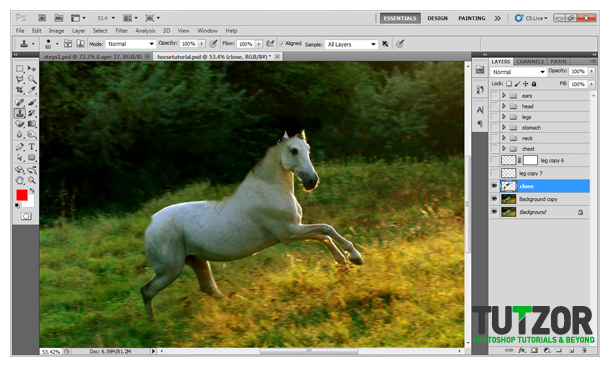
Here is a sample of my bald horse with no hair… Kind of looks like a great Dane doesn’t it! Scary…

Step
40
 sunrise20
Member since:
Mar 2011
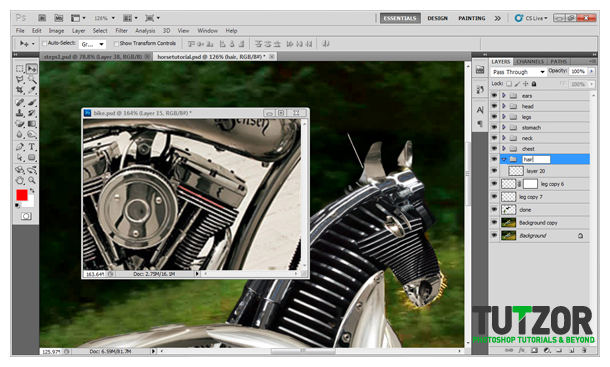
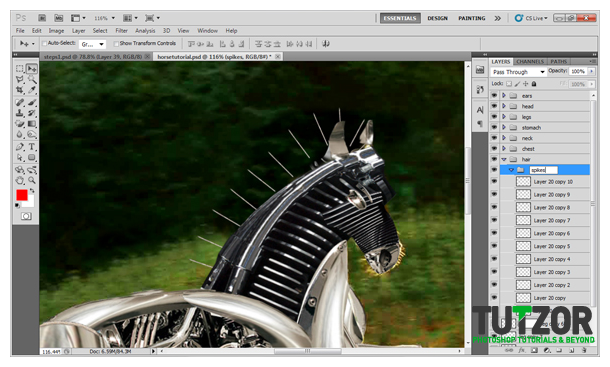
We are almost done so hang in there. We are now going to add hair. Crop out the highlighted piece and place this on the horse canvas similar to where I placed mine. The naming of these layers does not matter. I named mine “layer 20” and put it into a group called “hair” and placed the group below the “chest” group.

Step
41
 sunrise20
Member since:
Mar 2011
Begin duplicating this layer and put about 9 to 10 layers of these evenly apart. Once this is done, select all of these layers and put them into a group called “spikes”.

Step
42
 sunrise20
Member since:
Mar 2011
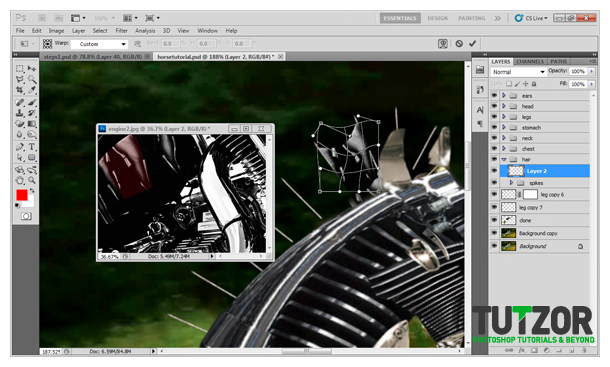
Next, crop out a section like mine from the image “engine2” and place this on the horse canvas and use the method of transforming, warping and masking any unwanted parts.

Step
43
 sunrise20
Member since:
Mar 2011
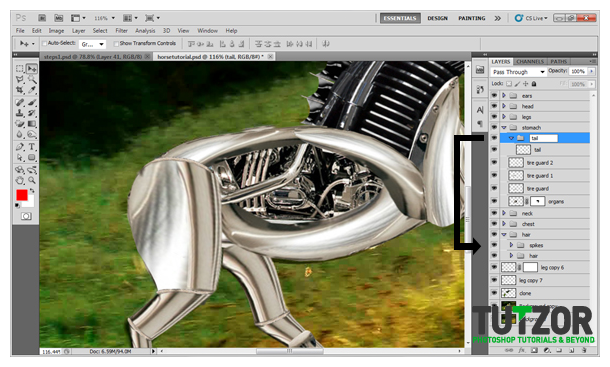
Place this layer into a group called “hair” and put this group under the “spikes” group.

Step
44
 sunrise20
Member since:
Mar 2011
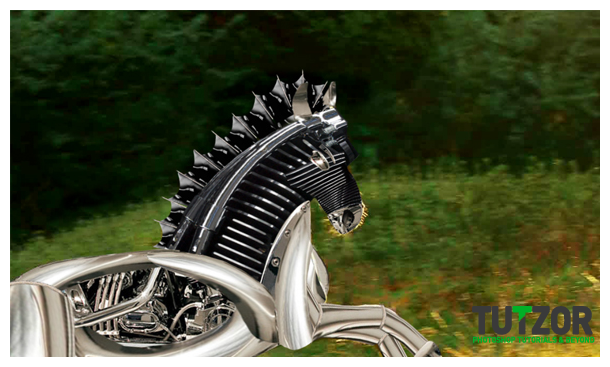
Once again, the name of these layers does not matter so just duplicate this layer as needed and adjust accordingly. Refer to my image to see what needs to be done.

Step
45
 sunrise20
Member since:
Mar 2011
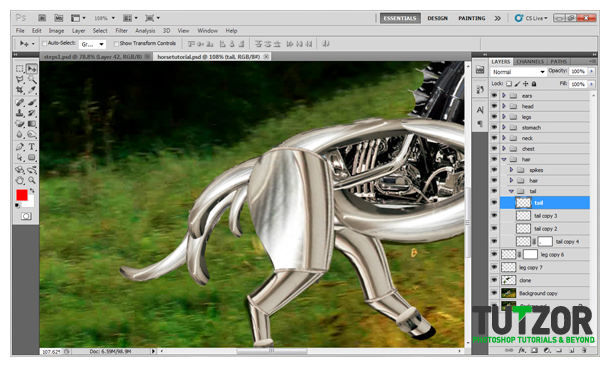
Now let’s add the tail. I am going to duplicate the “tire guard 2” layer and name this “tail”, group this layer naming it “tail” and then moving this group under the “hair” group.
Pretty much the tail is up to you but this is what I came up with.

Step
46
 sunrise20
Member since:
Mar 2011
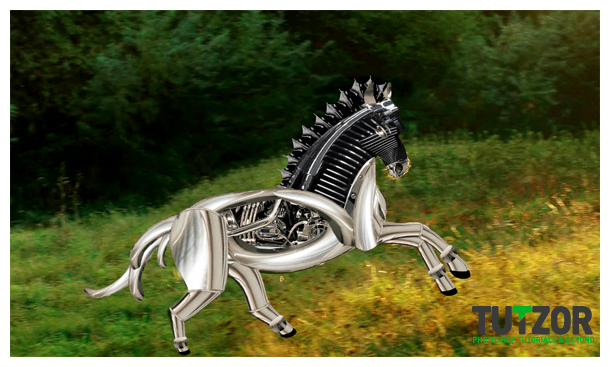
Now let’s take a step back and look at our robotic horse! Awesome.

Step
47
 sunrise20
Member since:
Mar 2011
If we wanted to change the background of our horse, just find an image and place it above the “clone” layer and see how it looks. I added a layer above my "clone" layer and added a gradient to the background and a full moon and stars. I hope you enjoyed this tutorial!
