Scared Photomanipulation Tutorial - PART 1

20
Aug'10
Cpotorac
Member since:
Aug 2010

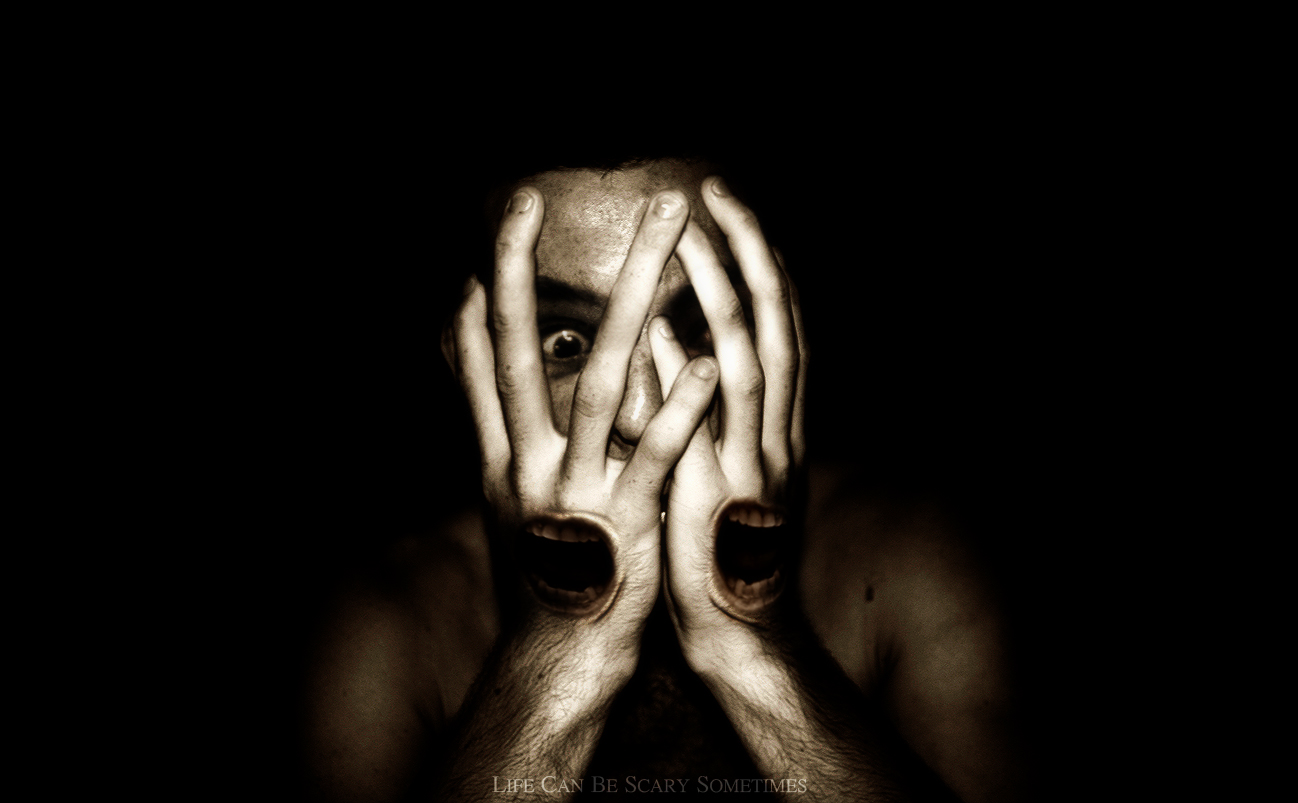
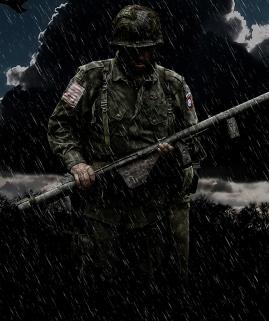
This tutorial will be a little different than all the other tutorials I wrote. Here I will teach you some basic things about Photomanipulation.

Rating

Your rating: None Average: 4.6 (67 votes)

Required Files

Final Image

Step
01
Cpotorac
Member since:
Aug 2010
Photomanipulation stands for working with images and manipulating them in all the possible ways you can imagine. To start making a photomanipulation you will need first to make a sketch or at least order things up. The images I will use for my work will be: http://www.sxc.hu/browse.phtml?f=view&id=650992 http://www.sxc.hu/browse.phtml?f=view&id=509215 http://www.sxc.hu/browse.phtml?f=view&id=730796
Step
02
Cpotorac
Member since:
Aug 2010
Now open up the first image. This will be the image that we plan to manipulate.
Step
03
Cpotorac
Member since:
Aug 2010
What I want to do next is to remove his eyes. How do I do that? It is actually a simple process but you must work hard and be careful to the details. Using the Lasso Tool, make a selection over the guy’s forehead and copy the piece you just selected to a new layer (Press Ctrl + J). We will use this piece to hide the eyes. Name the layer left patch.
Step
04
Cpotorac
Member since:
Aug 2010
Place the piece you just copied over the eye on the left and add a mask layer to it by pressing the Add layer mask button.
Step
05
Cpotorac
Member since:
Aug 2010
Now select the Brush tool set to 0% Hardness and set to Black. Also make sure you have selected the mask thumbnail of the piece. Now simply paint over the piece. This will hide it. This is better than deleting the image because you can always come back and repair if you make any mistake.
Step
06
Cpotorac
Member since:
Aug 2010
Repeat from Step 3 but this time select a piece from the right side of the forehead and also name the layer right patch. Mask it the same way you did with the other side.
Step
07
Cpotorac
Member since:
Aug 2010
Now it is time to make the eyes. First make a new folder on top of all the other layers and name it Eyes. Import the last image from the images we are going to use.
Step
08
Cpotorac
Member since:
Aug 2010
Make a selection over his left eye, copy it into a separate layer and name it Left eye. Repeat this for the Right eye.
Step
09
Cpotorac
Member since:
Aug 2010
Move the 2 eyes in the Eyes folder. Resize them and fix them into position.
Step
10
Cpotorac
Member since:
Aug 2010
Now we need to make the eyes look like they belong to this scared little fellow. Have the Left Eye selected and then go to Image – Adjustments – Black & White (If you not using Photoshop CS3 then you will not have this. In this case use Desaturate). Try and play with the settings there to make it look darker.
Step
11
Cpotorac
Member since:
Aug 2010
Now go to Image – Adjustments – Hue/Saturation and try to make the patched eye the same tone as the man.
Step
12
Cpotorac
Member since:
Aug 2010
Repeat Step 10 and 11 for the Right Eyes this time.
Step
13
Cpotorac
Member since:
Aug 2010
Now Add a layer mask for both eyes and start masking them to make the guy look through his fingers. When you finish set both eyes to Multiply.
Step
14
Cpotorac
Member since:
Aug 2010
Next I want to make this guy to look very scary, not only scared. What I want to do it make his fingers large. To do this we will use the same technique as we did when we covered the eyes. Use the Lasso Tool to select the fingers you want to make longer, copy the selection into a new layer and move it into position. Than start masking it to make it blend in nicely.
Step
15
Cpotorac
Member since:
Aug 2010
Repeat Step 14 for all the fingers or for a few of them as I did.
Step
16
Cpotorac
Member since:
Aug 2010
Now it is time to make the guy look very scared. To do this I will make 2 mouths on his hands. Import the last image.
Step
17
Cpotorac
Member since:
Aug 2010
As we did with the eyes use the same technique with the mouth. Select it and copy it into a new layer. Put in into position and transform it as you want. Than go to Image – Adjustments – Black & White and play with the settings until the mouth looks close to your object. Than go to Image – Adjustments – Hue/Saturation and play with the settings there until the mouth will blend in with the man behind. Also make a folder and name it Mouth. Move the mouth layer in that folder.
Step
18
Cpotorac
Member since:
Aug 2010
Now you need to mask the mouth. Use the Add layer mask button than brush away the unwanted parts of the mouth.
Step
19
Cpotorac
Member since:
Aug 2010
As you can see the mouth does not blend in too well with the rest of the image. We need to play with the Hue/Saturation some more.
Step
20
Cpotorac
Member since:
Aug 2010
Copy the mouth to the other hand and rotate it. Than transform it and warp it carefully to make it look good.
Step
21
Cpotorac
Member since:
Aug 2010
The image looks great. But I want to make some details that will give the image a boost. Make a new layer and using the gradient tool and black color, try to make some shadows over the mouth. Then mask the layer and brush away some parts that are not necessary. Finally set the layer to Soft Light.
Step
22
Cpotorac
Member since:
Aug 2010
Now repeat Step 21 but this time make the shadow for the other mouth.
Step
23
Cpotorac
Member since:
Aug 2010
To make more details I will use a part of the guy. To do this you can do it using the brush tool or the Burn and Dodge Tools, but in this example I will use the Lasso Tool and only the Burn tool. Select the part that I selected and copy it into a new layer.
Step
24
Cpotorac
Member since:
Aug 2010
I will move this piece of the hand into position and mask it. Then set the layer to Hard Light.
Step
25
Cpotorac
Member since:
Aug 2010
Using the same shape I will make some more wrinkles around both mouths.

Comments

Comments

20
Aug'11
Max Manus

Re: Scared Photomanipulation Tutorial - PART 1

Realy scared...cool

18
Aug'11
Anonymous

Re: Scared Photomanipulation Tutorial - PART 1

Although it could be more freaking then what the tutorial came up in the end. But still there is no doubt designer knows how to create the effects, good creativity and perfect use of tools.

19
Jan'11
Corporate Logo Design

Re: Scared Photomanipulation Tutorial - PART 1

WOW!! I like this fantastic tutorial post to make this type of photo manipulation art work on photoshop.
Thanks for share with us.
Custom Logo Design

08
Nov'10
william.smith61

Re: Scared Photomanipulation Tutorial - PART 1

Amazing Information here ...I really Like that.

-----
Willim teacher of pass4sure SY0-201